LuoPads???

I set out to learn how, make some, and get some friends to join in!
LuoPads are the washable/reusable sanitary pads being shipped overseas to women in less fortunate circumstances than we privileged Americans. I first learned about them when my husband traveled with a team from our church to South Sudan last year. Partnering with Global Aid Network (GAiN), our team delivered a box of LuoPads to a group of pastor's wives in Juba, S. Sudan--and the women went crazy with joy! Ululations, Clapping, Cheers! Excitement grew with the possibilities of using these when reaching out to the women in the bush.
I used GAiN's website to get all the information I could: http://www.gainusa.org/get-involved/engagement/engage-luopads/
The vision Behind LuoPads video will bring you to tears:
The Vision Behind LuoPads from Global Aid Network (GAIN) USA on Vimeo
And there is a video explaining how to sew them, too!
How to Make LuoPads from Global Aid Network (GAIN) USA on Vimeo.
Because sewing LuoPads is a little bit complicated, I've made a step-by-step pictorial instruction guide to SUPPLEMENT the GAiN website instructions and videos. The website gives specific tips and instructions for raw materials needed and templates for cutting out the materials. I just had so many questions and had to SEE it for myself, each step of the way.
One problem I ran into is that the template itself, when printed as a pdf doesn't exactly match the measurements listed (9.75 in. long for flannel).


Depending on who is printing out the material for your pattern, you need to make sure that the size towels you are using fit the size flannel you are using! Which is better? There is no right answer. Women need different "size" pads at different times in their cycles. When I ship a completed bag of pads (6 pads, 2 pair underpants, washcloth, safety pins, etc.), I mix up the different sizes on purpose so the recipients will get a variety.
 For thick towels, I use 2 towels of thickness, for thin towels/washcloths, I use 3 towels. (I try to use as much towels as I can fit under my needle.) Then I like to baste my towel layers together so they don't slide around when sewing to the flannel. I "assembly line" my towels and stitch them end-to-end to get the job done quickly. This is also a great job to give to a beginner who doesn't sew much, but can do a straight line!

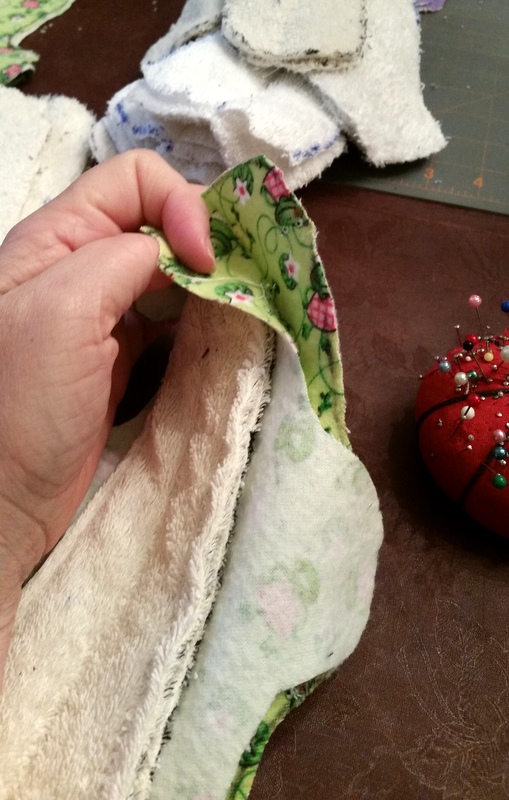
Next step is to sew the towels to the Wrong side of one piece of flannel. Sew down the middle and around the edges of the towel.


It should look like this from the back. 

Now place Right Sides Together of the flannel. Pinning them together is a good idea.

When you sew the right sides together, you have to leave a 2-inch opening to be able to pull the whole thing through inside-out. I prefer to leave my opening on one side. Many women prefer to leave one end open. Either way will work fine.


Once you have sewn a quarter inch around the outside, it is a good idea to check your stitches--just in case the two pieces of flannel weren't exactly the same size. You may want to notch the inside corners and trim excess fabric--especially where the snaps will be later on. Take the time to TRIM the wings so that they aren't too bulky when trying to add snaps later on.
Next, it is time to turn the pad inside-out. Many women use chopsticks or a skewer to help push out all the inside edges.


The next step is to top-stitch it all the way around. You will need to pin your opening closed. It is fine to just machine-stitch over the opening--you don't have to hand-stitch the window closed. For the top stitch, just go all the way around the border of the pad--staying close to the edge. Then, with the needle still in the top of the pad, you can sew right down the middle of the pad and make one last trip around the edges of the towel inside to secure everything together.


It should look something like this.

But now you should take a good look ALL over your stitching to make sure you don't have any gaps. You might have to zigzag over a missed or frayed edge! This usually happens in an inside corner! (I had to "fix" about 30% of the pads sewn at our first ladies sewing party. You know what they say, "A stitch in time, saves nine.")

At this point, you are done with the actual pad! If you ship your pads to the warehouse in Pennsylvania--details on the GAin website--they will add the snaps for you and ship them to women in a variety of countries!
Here is a bag full--ready to be snapped!! There are some awesome ladies out there!!

For those of you who have the KamSnaps and tools (size 20mm), here are the instructions. Warning: it takes a firm grip to squeeze the KamSnap tool. (Once again, after our first sewing gig, I had to remove/repair about 30% of the snaps that had been done. The snaps just fell off after the first unsnapping! In addition, snaps that were done incorrectly had been torn apart--ripping the material. More tips on repair, later!)
First you must poke a hole at the edge of the "wings".


There is a "male" part and "female" part that have to snap together, so you'll need to think about which side you are putting the snaps in on. My tip is that there should only be one finished back of the snap showing when the pad is laying on the table. (One snap faces one way, the other faces the other direction.)


Place the back of the snap into the disc. The male and female snap parts go where the rubber presser is. You really must have a firm grip when you squeeze that KamSnap tool! I squeeze it about 4 times!


Once you get the snaps on, it is time to CHECK YOUR SNAPS! (I sound like a math teacher, here!) I snap and unsnap 3 or 4 times to make sure they are on good and tight. (Did I mention that I had to re-do about 30 of them??) It just happens.
Here is the trick for removing a snap that is broken or put on the wrong direction: I use an OLD hot glue gun. I heat that bad boy up, set it on the snap, and wait for it to melt. I promise you, this will save you from ripping those pads apart with pliers trying to get the bad snaps off!!!
Here is the finished product:


The snaps hold it discreetly together when not in use. When they ARE being used, the snaps go underneath the underpants--holding the pad in place! It is amazing!
Pretty soon, you'll have a box of LuoPads ready to send overseas!

We are sending ours to women from South Sudan . . . even those who are in refugee camps in Uganda waiting out the war.

For our next sewing dates at Shandon Baptist in Columbia, South Carolina:

These instructions and pictures are so helpful! Thanks Kristin!
ReplyDelete:) P.S. I have precut towels and flannel for those of you who would like a stack to take home and sew!
ReplyDeleteHi Kristin, I/we enjoyed having you in our class on Sunday. I love the idea of the luopads and helping women in other parts of the world. It is a terrible thought of not having pads for a women's period. :-( I would like to help by sewing pads. I am not able to come on your sewing nights at church but could sew at home when I had a free hour or 2. I do have a machine (I made most of my own clothes in high school and after), I also just read through your instructions, I think I could sew these. You said you had bags of material and liners already cut out, if I could meet up with you on a Sunday morning and pick up some I would be happy to help out. Thank you for sharing your heart and mission with us!
ReplyDeleteThank you so much - I will be introducing this idea to VoFE - Victims of Forced Eviction (mostly women) and HRTF Housing Rights Task Force in Cambodia - best wishes - Michael
ReplyDeleteI'm so glad you are able to use the idea--Doing for the Least of These, my brethren! GAiN is sending them to refugees and emergency crisis places all over the globe.
DeleteHi Kristen,
ReplyDeleteI was saddened in Haiti when I learned the girls were unable to attend school during their periods. I am unable to physically go to Haiti at this season in my life but am starting a ladies group at my church two times a month to make Lua pads to send to various mission groups we help. Could you please tell me where you found the plastic snaps? What size are they? Thank you
Kristen,
ReplyDeletePlease disregard my previous question. I now see that you address the snaps. I guess I need to decide to purchase tool or send to GAIN to add them.